I fear not – for I’ve entered every contest as many times as I possibly can, like this one from Jen at Tatertots and Jello. Care to take your chances?

I fear not – for I’ve entered every contest as many times as I possibly can, like this one from Jen at Tatertots and Jello. Care to take your chances?
I’m never Christmas-obsessed this early in the season, but now that it’s cooling down outside it’s all I can think about. Maybe it’s because I have a toddler who I know will actually be excited for Santa’s visit?
Since it’s not acceptable (to my husband) to start decorating for the holidays yet I am trying to satiate myself on Pinterest. I really want to spice up my gift-wrapping style this year so that’s been my search theme of the week. Want to see some of the goodies I’ve found?
First up: Dana @ Made has a great tutorial for felt monogram ornaments. These are great little gifts on their own, but picture one tied on top of a wrapped present. And it doubles as a name tag!

What about adding a sweet treat to your gift? These snowman candy bar wraps with little felt hats and scarves from Kerry @ Kerry’s Paper Crafts are super cute! It seems I’m going to have to make these for the bug’s daycare class as a ‘first snow’ treat since she crawled up on my lap and started yelling “oh-man” at the picture :o)

This great idea comes from Jordan @ Polka Dot Prints I’m a sucker for anything done with baker’s twine, and these little baubles are no exception. Make a bunch of these to coordinate with your wrapping and the recipient can enjoy them as ornaments for years to come.

I’m a big fan of edible gifts and so, it seems, is Andrea @ Playing with Paper. You can color coordinate or choose a favorite vintage candy, there are so many possibilites with this one! I’d love to receive a yum-filled ornament on top of a gift, wouldn’t you?

Tosha @ Stamp Talk with Tosh has an amazing tutorial for a gift bag topper. This is such a unique classy look, I love it!

I’m loving this 3D star wreath tutorial by the ladies over at Little Birdie Secrets. I’m also thinking that individual stars of different sizes would make cute gift toppers or tags, with later ornament potential. Or even a mini version of the wreath…ooh, might have to try that!

Burlap crafts are super popular right now, and this holly gift topper by Michelle @ A Little Tipsy is super cute. I like to see the classic holiday accents done in new ways.

This little topper from Camilla @ Family Chic couldn’t be easier or cheaper and is ridiculously festive. And the kids could easily get in on this action. You could even vary sizes with mini and jumbo cupcake liners.

Of course we have to have some upcycling representation. The result of this grocery bag pom pom tutorial from Grace @ Design Sponge is both festive and fluffy. And thinking about how many stores do seasonal bags, it would be way easy to get the holiday color palette going.

I adore a multi-purpose gift topper. This beautiful embellished clothespin from Ez @ Creature Comforts could be used for any number of things around the house. I think mine would end up a fridge magnet to hold all the bug’s artwork. OK, now I must make scores of them.

I love this idea so much I’m including two versions from Camberley @ Fancy House Road. I think felt is going to be my favorite crafting material of the season. Call me crazy, but these ideas might make cute headbands for the bug too…

 The classic munchkin handprint ornament gets lightened up with Crayola Model Magic and fancied up with a pretty satin ribbon on Lindsey’s Little House Blog. I know some grandparents who would love to get these as holiday gift toppers, don’t you?

I love the modern simplicity of this paper pom pom topper from Ez and Marichelle @ Nice Package. Endless color and pattern combinations to fit any theme – oh the possibilities!

I love the combination of rolled flower and monograms used by Stephanie @ Under the Table and Dreaming. I’m all over the monograms-as-tags thing this year, You’ll see a lot of R’s under my tree this year.

Not only does Jessica @ How About Orange provide a killer paper snowflake tutorial, but she gave the world this little packaging gem. You simply cannot throw that hard work into the trash can after you open the gift.

I hope you feel as inspired as I do after snacking on all these awesome ideas. Even if I’m not allowed to decorate it’s not to early to start wrapping presents!!!
This weekend I was feeling both culinary and craft inclined, a rare occasion. While my better half pulled kid duty I made a combination grocery-craft store run to arm myself for the day. I may have dawdled a little bit because having a moment to myself outside of going to work is an amazing thing. It’s sad when Wal-Mart feels like a vacation. Fast forward a couple hours, with quiche cooling, chocolate chip pumpkin bread baking, and beef stroganoff crockpotting (what? that’s totally a verb) I began my assault on this foam wreath.

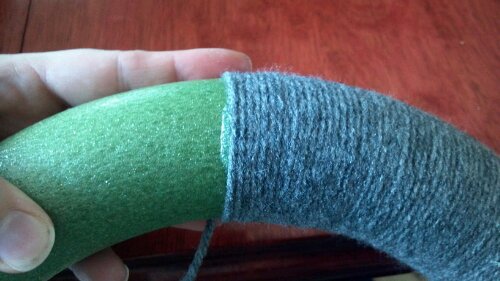
Yarn-wrapped wreaths are all over the place right now and I’ve been coveting each and every one. But there’s no reason to long for something when it’s ridiculously easy to make, and pretty darn cheap too. I spent less than $15 for all the supplies, including the new glue gun and glue sticks because a particular spouse of mine, who shall remain nameless, jacked my other glue gun for his classroom. And a particular friend of mine, who shall also remain nameless jacked my other other glue gun. This is why I buy the cheap mini glue guns. But, el cheapo still does a fabulous job of hot gluing the yarn on the back of the wreath at 2-3 inch intervals. It’s a bit tedious, but it only took about a half-hour to wrap a 12 inch wreath.
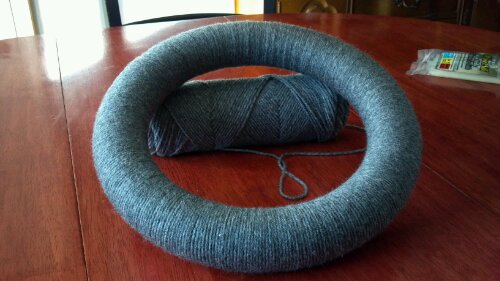
Behold, a new sexy, yarny (it’s an adjective, I swear), smoky grey wreath. Gorgeous unto itself but it could use a little sauciness, don’t you think?
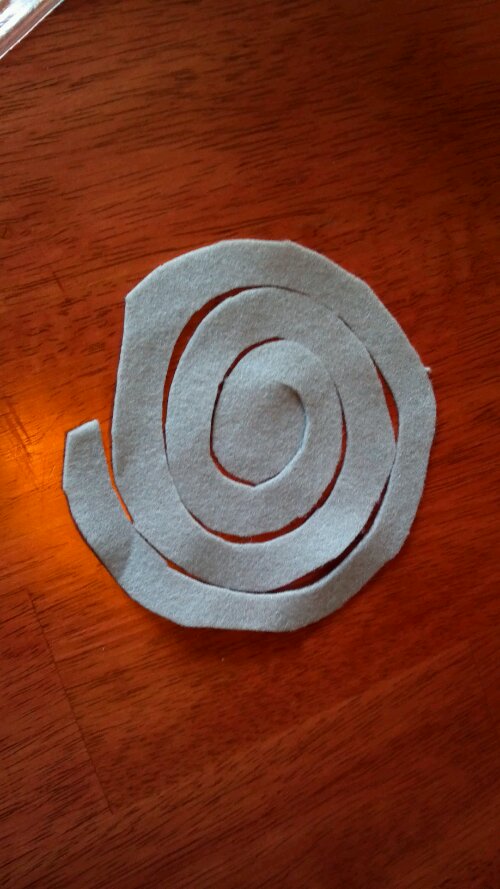
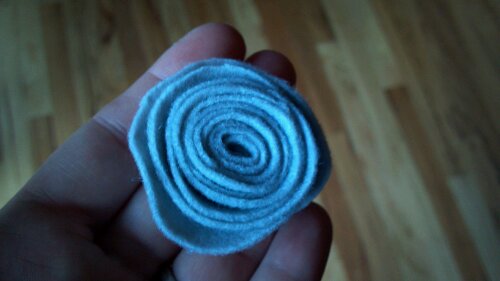
There are lots of variations on hand made felt flowers, and they’re all pretty easy to make. I went with some more modern-looking rolled flowers for my creation. Easy-peasy. You start with a circle of felt, cut in a spiral towards the middle. Leave the little resulting circle in the middle intact, this will become the bottom of your flower. The bigger the circle the bigger the flower.
Starting at the outside end, roll the felt up, adding dabs of hot glue as you go to hold it all together.
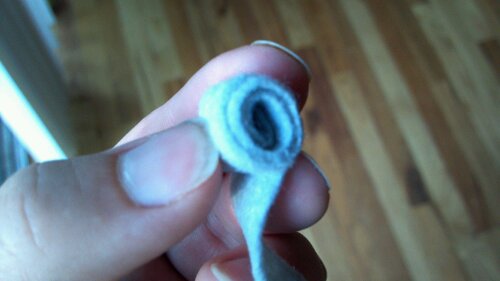
When you get to the middle of the circle, fold the little circle of felt over to cover the bottom of the flower and secure with hot glue.
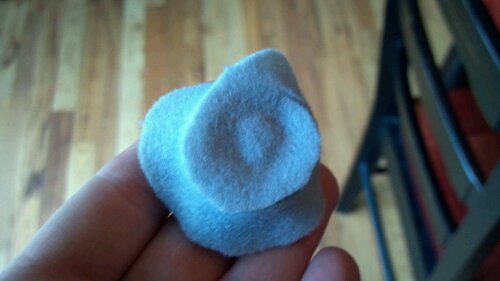
Ain’t it cute? Wash-rinse-repeat for different sizes and different colors and glue them onto your wreath as you see fit.
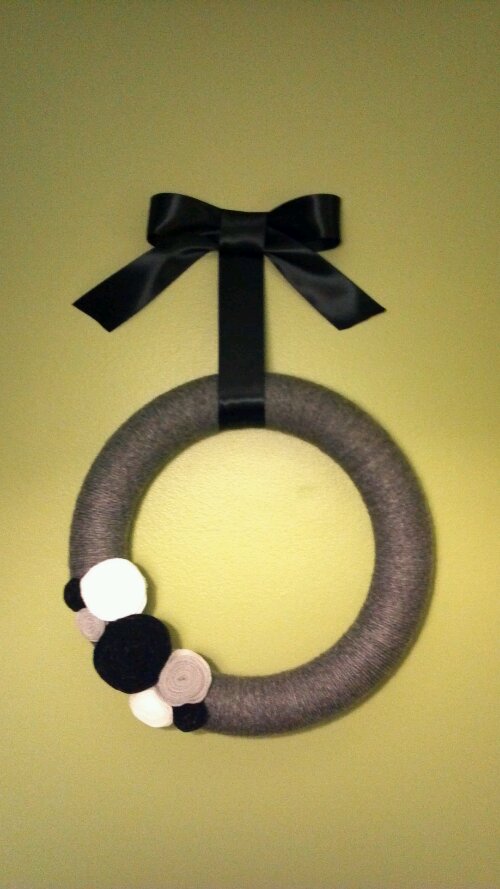
Here she is, in her final resting place on my living room wall next to the front door. I added a black satin ribbon, or you could hang with a nail, hook, industrial strength adhesive, whatever floats your boat.
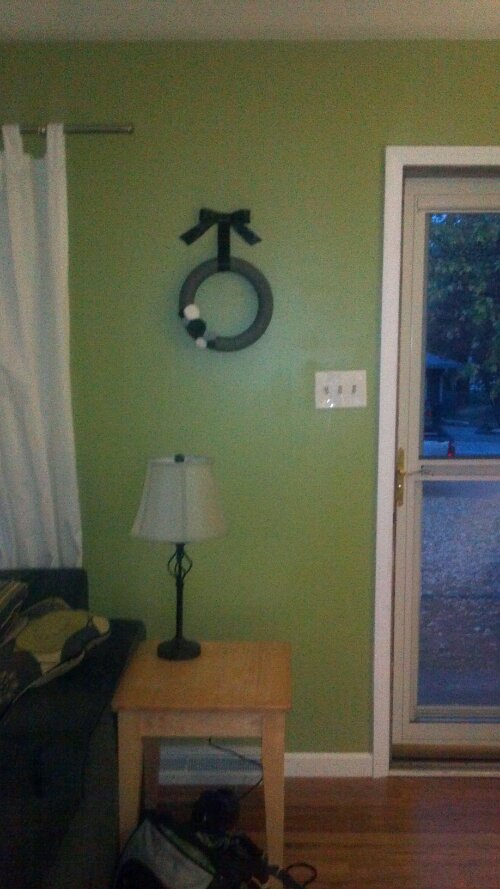
A little perspective on the location. Forgive the grainyness of this shot, my camera is afraid of the dark (eeee!). It was Halloween Eve, after all.
Linking up to:


I fell in love with a duvet set from Ikea and we decided to use it as our starting point in the guest room. Falling in love? At Ikea? I know, shocking. It was even a solid color – how hard could that be to work with? This bedding was a deep, dark eggplant purple and it needed to be mine.
I immediately started thinking about paint colors to go with purple bedding and black furniture. I thought grey would look fantastic, but I had just painted 50% of the house grey and I’m a girl who needs variety. My husband suggested lavender. Apparently he has not actually met me, or else he would have known that the one color I detest more than any other is lavender. No thank you. I was pulling for a soft yellow, but he went straight to the extreme and chose a deep mustardy gold. I wasn’t sold on the color, but in my shock at his choosing a ballsy color I WENT for it.
Have you ever decorated a room based entirely around one piece of decor you love? Is it just me or does it always become SO MUCH HARDER to find things that “go” when you do it that way? Especially when you box yourself in with a really bold choice of wall color. Of course, I had a empty wall that really needed some art and Lord knows I wasn’t going to find anything that fit the bill. What was left to do but make my own? Inspired by this lovely project I found on Pinterest, I set to work.
I decided to free-hand the puff paint directly onto a 16″ x 20″ blank canvas I bought at Michael’s. I used black so I could see what I was doing since I was going to paint over it anyway. And it’s a good thing since I had a little blurp-turned-smudge down in the corner. Sue me, I haven’t used puff paint since 1992.

Once the puff paint was dry, I brushed on a couple coats of Behr paint, color-matched to the bedding. I just bought a sample-sized jar, no need for a full quart here. And yes, I used interior wall paint on a canvas. It turned out great, so there. I only did two coats because I liked the slightly mottled appearance it gave the purple. It looked like more “legit” art to me.

Once the purple was dry I went back and brushed on metallic gold in a few places just to add some interest and to pull the wall color in and tie everything together. This is the final result.

Linking up to:
The first time we looked at our house we were sold. I’m talking the off whispering in a corner, rose-colored-glasses-wearing, terrible poker faces kind of sold. Hardwood floors! 3 bedrooms! A garage! A finished basement! A fenced-in yard! Appliances included! Everything was perfect. I even said several times, “We don’t even need to paint! I love this color!”
Then reality set in. We really did get a fantastic house, but of course it wasn’t perfect, and the first thing that had to go was that paint. That color I loved so much when we looked at the house was beige. The same exact shade of beige in almost every single room in the house, like the previous owners had gotten one heck of a deal on 27 cans of paint that no one ever picked up from the mixing counter at Home Depot. I already warned you about the rose-colored glasses, didn’t I?
The minute we moved in we got right down to painting the living and dining rooms. We only had a few days before our furniture would be delivered and we needed to take advantage of the space while we could. We put the Bug in her baby jail with a bunch of toys and set to work, all the while dancing and singing to her in an attempt to keep her entertained. Yeah. About that… Have you ever spent several hours completing a task while simultaneously trying to keep a fenced-in one-year-old alive and happy? And how did that go for you? Yeah, same here. Bug channeled her Hulk strength and dragged her jail all around the living and dining rooms trying to get to Mommy and Daddy, crying all the way. To get a little perspective, this is the type of “jail” I’m referring to. It’s not light weight, at least not for a toddler.

Eventually we had newly whitened ceilings, a bright white window frame (formerly “wood”), and two grand wall colors: ‘Seal Grey’ and ‘Spanish Olive’ (colors are from Glidden chips, but we used Behr paint) to complement our soon to be delivered living room set. As is typical, hubby was skeptical of my vision, but he loved it as much as I did when it all came together. I am not afraid of color!


Like my $30 Craigslist coffee table? I’ve got a whole other post cooked up about that, just you wait!
So the grey continued into the dining room since we have one long wall that is shared by the two rooms. The original plan was to paint the other two walls in the dining room a shade of yellow called ‘Butter’ because I desperately wanted a grey and yellow scheme in the dining room and had already bought yellow plates to display on the wall. Hubby was highly skeptical. The first coat went up and I thought to myself “it’s just the first coat, it will look great with one more coat.” Then the second coat went up. Ok, maybe I am afraid of color. Hubby and I spent several days afraid to tell the other that we hated it. We then blamed the necessity of ‘Butter’s’ death on my desire to paint the kitchen bright blue. Too many colors in one space and all that. Yep, that’s it. Luckily we had more grey paint!
I still wanted my punch of yellow though, so we looked to vinyl to solve that problem. Turned out pretty well if I say so myself. What do you think?


Linking up to:
It certainly doesn’t seem like only 4 months since our family moved into our very first oh-my-god-is-this-really-ours house when I think about all we’ve accomplished in that time. We somehow managed to paint the walls and ceilings in the living room, dining room, kitchen, hall, and guest room. We refinished no less than 6 pieces of furniture. We re-insulated the attic, installed a plywood floor for storage space, and added a pull-down ladder for easy access. We framed out one previously unframed open doorway and updated the rest of the trim in the kitchen. We also installed a new tile backsplash in the kitchen and while we were at it decided to update the old ugly outlets and switches. All that on top of your standard moving in and hanging up pictures. And with a 1-year-old thwarting us every step of the way. Good times.

Bug striking the ever-appropriate "raar" pose with our SOLD sign
Thankfully, we did have help from my Dad to knock out some of the more grueling tasks, but our families live far away and it’s all on us now. I’m getting tired just thinking about it.
Psychotically, I still have quite the list of projects ahead, and of course I have a few banked that I’ll be blogging very soon. In the meantime, check out all the awesome things that inspire me on Pinterest.
